In the subject of photography ISO is a term used to refer to a camera’s sensitivity to light.
When taking a photograph, either the photographer manually sets the ISO or the camera will set it automatically in response to the light. When the photographer decides to control the ISO, they are essentially forcing the camera to respond to the light in a particular way in any given situation. Unlike Aperture, ISO doesn’t depend on the lens, but is determined by the actual camera. It is measured on a scale and the range of this scale can differ hugely amongst different camera models.
As an example, the Canon 6D is considered to have an extensive ISO range of 100 – 25,600. As this is considered quite large the ISO can be adapted to suit most situations.
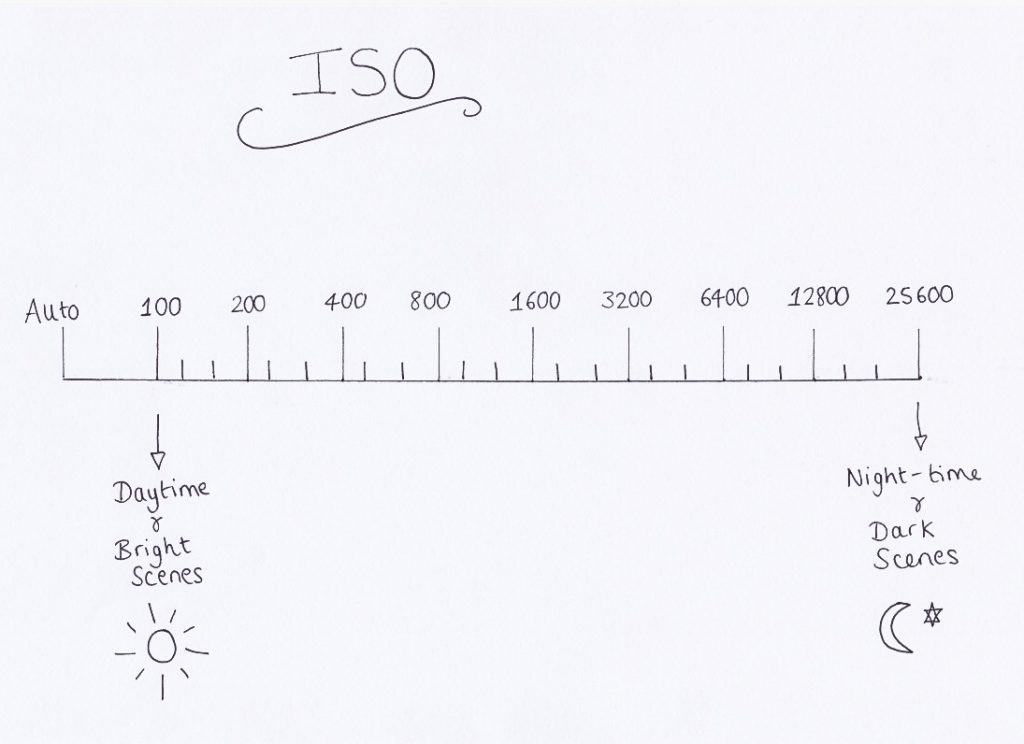
When looking at the Canon 6D ISO scale, we can see that each stop is double the amount of the previous stop – meaning the camera’s sensitivity to light is doubling as the stop increases. It’s also possible to set the ISO to AUTO which will leave your camera to decide the ISO depending on the situation you are shooting in.
Using ISO
So, why do photographers have the option to control the ISO rather than letting the camera handle it automatically?
As ISO is related to light it is usually adjusted depending on the time of day and when in low light situations. For example, imagine you are doing a shoot in natural light during the day and you can’t seem to get the right exposure or the image is blurry – adjusting the ISO might help.
If you are producing underexposed images it could mean you simply don’t have enough light in your situation. When increasing the ISO the camera could be likened to a sponge as it is forcing the camera to absorb as much light as possible to create the right exposure.
However, there is one draw back to increasing the ISO. As the ISO increases, the camera is forced to become more sensitive to the light around it. As this is essentially a deliberate act, the final image will have an added grain or noise effect which is something to take into consideration. Generally speaking the best way to manage the noise/grain in photographs is to use the lowest ISO you can in any given situation.
In the two photos below you should be able to notice that the quality is very different. Particularly with regards to the colour of the background and the texture of the teacup.


Both of the above images were taken in quick succession in natural light with a camera mounted on a tripod changing only the ISO whilst in Aperture priority mode.
In the first image the ISO was set to 100 and I would say that the background is smooth and black colour, the teacup looks smooth and glossy and overall the quality is good. In the second image the ISO was increased to the highest possible amount of 25600. Upon close inspection you should be able to see that the black background has become lighter and that tiny dots have appeared. The texture of the teacup also looks different to the first image, perhaps less smooth and almost fuzzy. This increase of texture is an example of noise/grain creeping into the image due to an increased ISO.
Hello ISO!
Perhaps it is time to experiment with ISO. It could be interesting to see how far your camera can go up on the ISO scale until noise/grain appears in your photos. The Canon 6D appears to be capable of reaching up to 6400 ISO until noise/grain appears. Likewise, you might want to try a little ISO experiment if you find some of your images to be blurry.
As mentioned previously, if you find you are taking a lot of blurry photographs an ISO adjustment could be the answer. Firstly, if you are holding your camera when shooting, the blur could be due to using an extremely low shutter speed. When you have a slow shutter speed, the camera doesn’t have enough time to counteract any tiny movements you make when pressing the shutter button – this can sometimes cause an image to blur. One way of reaching a faster shutter speed is by forcing the camera to become more sensitive to the light and one way to do this is by increasing the ISO.
In addition, with a faster shutter speed you should be able to use smaller apertures if you prefer, as now you have lots of light, you might not need to dial in a big aperture.
Fin.